This extension for the Volunteer Sign Up Sheets plugin allows you to set up triggers and conditions to automatically send out emails to predefined lists.
Overview
The Automated Email Triggers can be used to do things such as sending out a weekly summary of upcoming events, sending out emails a certain number of days before an event if there are still spots left to fill, sending out thank you emails a specified number of days after an event ends, and much more.You can also manually send out any email to any list, using any email template, which is perfect to send out notifications when a new event is added (you can manually trigger the email from a form on the tasks page, or from the “Send Emails” tab, after you enter and save all the info for your new sheet and tasks), as well as for anytime you want to manually control when the emails are sent.
Settings can be found in the “Automated Emails” submenu of the Sign-Up Sheets admin menu.
Settings
General
This section has two simple settings:
- Test Mode – Check this to put the plugin into test mode. While in test mode, any emails that would have been sent will instead be sent to the below test email address, or to the admin email address if the test email address is empty. Note that if there is a scheduled trigger event that would normally get sent while you are in test mode, no emails will be sent to the list (only to the test email address), and the scheduled event will NOT be updated. Once you disable test mode, any scheduled trigger emails that should have gone out will be sent the next time the CRON function is triggered (roughly once per hour).
- Test Email – Enter the email address where you want emails to be sent while in test mode. Leave blank to just use the admin email address.
Email Triggers
Before you create a trigger, you’ll need to define at least one email template in the Emails tab, as that is a required field when creating a trigger.Trigger Settings:
- Trigger Name: This is the admin name for the trigger. Give it a descriptive name so that you can remember what each trigger is for. Each trigger needs to have a unique name.
- Email List: This is the mailing list of who will receive any emails sent by the trigger. The options include:
- Matching Sheet/Task Signups – this emails all signups found for sheets or tasks that match the conditions you set
- All WordPress Users – emails all the current WordPress users in your database
- All Signups still in database – gets all the unique emails from the main plugin’s signup database
- All WordPress Users and All Signups still in database – a combination of the previous two selections, but using only unique emails (so no duplicates)
- Custom – Use a mailing list you create yourself on the Mailing Lists page
- Custom Maling List: This option is shown if you select “Custom” for the Email List. You will need to create at least one custom email list from the “Mailing Lists” tab first to use this option.
- Trigger Type: This defines the event or action that will activate this trigger, sending the associated emails when any conditions are met. The current options are:
- Weekly on selected days (you can select as many days as you want)
- Monthly on selected days (select as many as you want)
- X days before first Sheet date
- X days before each Task date
- X days after last Sheet date
- X days after each Task date
- On Signup
- On Clear Signup
- On Sheet Filled
- On Task Filled
- On X Sheet spots remaining
- On X Tasks spots remaining
- Weekdays: This multiselect option is shown if you selected “Weekly on selected days” as the Trigger Type. This is generally used to send out a weekly summary of upcoming events, but can be used to send any type of email that you want to send out on the same day, or days, every week. You can select one or more weekdays to send the emails.
- Days of Month: This multiselect option is shown if you selected “Monthly on selected days” as the Trigger Type. As with the weekly option, this is generally used to send out a regular summary of upcoming events, but can be used to send any type of email that you want to send out on the same day, or days, every month. You can select one or more days to send the emails, and it includes such options as “First Day”, “Last Day”, “First Monday”, etc., as opposed to specific dates.
- Email Template: This is where you select which email template will be used. This is a required field, so you need to create at least one email template on the “Emails” tab first.
- # of Days: When you select one of the trigger types that starts with “X days”, this is the field where you specify that number of days.
- Sheets: Select one or more sheets, or the “ALL Sheets” option, to specify which sign up sheets should be included in this trigger. Note that sheets, and their associated tasks, may be filtered out, depending on any conditions you set. Even if you specify ALL Sheets, old/expired sheets will NOT be included, except for when the trigger type is “X days after last Sheet date” or “X days after each Task date” and those dates are within the value you specify for the X number. If all sheets/tasks are filtered out, based on any conditions you set, then the email will NOT be sent. Similarly, if you select “None” for sheets, then, currently, the trigger will never send emails as there will be no sheets/tasks to use for data for the template tags.
- Conditional Days: This is the first condition that you can use to filter out sheets/tasks from being included in the data for the email trigger. For example, if you are sending out a weekly email with a summary of events in the coming week, you could set this to 7, and any sheets/tasks whose start date is more than 7 days later than the trigger day will not be included. If there are no Sheets/Tasks within those 7 days, then the email would not be sent that week.
- Additional Condition: Key — You can specify an additional condition that will determine whether or not a sheet/task will be included and if the email will get sent. You can select “Sheet”, “Task”, or “Signup” if you wish to set a condition, otherwise leave it set to “No Condition”. If you make a selection other than “No Condition”, then 3 more fields will appear where you can define the rest of the condition values.
- Additional Condition: Value Type — If you choose “Sheet” or “Tasks”, there are two value types, the number or spots open, or the percentage of spots open. If you choose “Signup” then the only option is a number of days: “XX Days”.
- Additional Condition: Value — This is where you enter the value to compare, based on what you selected above. Percentages are entered as integer values based on 100 being 100 percent, e.g., 50 would be 50 percent.
- Additional Condition: Operator — Here you can select the comparison operator for the value specified above. For “Sheet” or “Tasks”, a complete condition would be something like the sheet has more than 10 spots open, or the tasks have less than 10 percent of spots still open. For “Signup” the condition would be within the next or previous XX number of days (good for doing a weekly or monthly signup summary, for example)
- Matching Signups Only? — This checkbox helps you, and the code, understand the intentions for certain triggers a bit more clearly. This is for situations where the trigger conditions/settings will create a collection of signups, along with a list of multiple emails to send the emails to. When you check this checkbox, the code will loop through the emails in the generated email list and then only use signups for that specific email in the templates. If you leave this un-checked, then all the matching signups from the other conditions will be included in the email templates for every email on the list. This would generally only apply when you are using the signups loop and associated template to show info from multiple signups. Here are a couple of examples of how this affects the generated emails. If you wanted to send a weekly signup summary to a specific email list, you would leave this un-checked, and then the {signups} loop template tag will show info from ALL the signups that meet any other conditions you set (such as signups for dates within the last 7 days). However, if you wanted to send weekly Thank You emails to everyone who signed up for something in the last 7 days, and wanted to include a list of what they signed up for, then you would want to check this checkbox so that only the signups that belong to that email are shown in the {signups} loop.
Emails
This is where you define your email templates that will be used for your email triggers. You can have as many as you need, and you can use the same email template for more than one trigger. Note the template tags at the bottom of the page when you add/edit an email template. The template tags can be used in both the subject of the email, as well as the body, and work with plain text or HTML emails. Most of these fields should be self-explanatory.
- Admin Name: Give the email a descriptive name so you can choose the right one for your triggers, if you have more than one.
- Content Type: You can choose to send your emails in Plain Text or HTML format. You should then use the corresponding message body text area to create your message body.
- From Name: The name you want to use for the From name in the emails that are sent (not the from email, that’s below).
- From Email: The email you want to use from the From email in the emails that are sent. Note that if you are using an SMTP plugin, or some other plugin to connect to an external mail server, this may need to match the login email for that account.
- Subject: The subject for the emails that will be sent. You can use template tags in the subject, such as the sheet name or the name of the person the email is being sent to.
- Plain Text / HTML – Message Body: Currently there are separate text areas for you to enter the Plain Text or HTML version of the email template. You need to use the one corresponding to the Content Type you selected. The HTML message uses the WordPress classic editor, and has all the associated tools for formatting the message body. You should always test out your HTML emails first, as what you see in the visual editor may not always translate exactly the same way in your emails.
- SHEETS loop template / TASKS loop template : These two text areas are where you can create the content that will be “looped” (repeated) for each sheet and/or task, when you are using a trigger that might include multiple sheets (such as a weekly or monthly summary). For this to show, you need to use the {sheets} template tag in the message body where you want the Sheets loop to appear. Similarly, if you want to loop over the tasks, you need to use the {tasks} template tag in the message body where you want the Tasks loop to appear. Then, within these loop templates, you can put any text you like and then use the individual sheet or task template tags to show specific sheet/task info. There is additional info at the bottom of the page describing which tags can be used for what.
Mailing Lists
To create a custom mailing list:
- Click on the “Create New Mailing List” button
- Enter an admin name that is descriptive so you can remember it
- Click on the “Save List Name” button first to setup the list in the database
- In the new form that shows up, select a source to start adding emails to the list. You can select from: WordPress Users, ALL Signups, Signups from a specific Sheet, or Manually Entered Emails
- If you choose WordPress Users or ALL Signups, then a button will appear to “Find Matching Emails”. Click that button and you’ll get a list of all matching emails, then you can select the ones you want with the checkboxes, then click the “Add to mailing list” button to add the selections to the list
- If you instead choose Signup from a specific Sheet, then a new select box will show that allows you to select the sheet. Then hit the “Find Matching Emails” button to get a list of all signups from the sheet (if there are no signups, nothing will show). Click the checkboxes for the ones you want to add and click the “Add to mailing list” button to add them.
- If you instead choose Manually Entered Emails, you will get two text boxes, one for the name, and one for the email, and you can manually type in the info and then select the “Add to mailing list button”.
You can add emails from multiple sources, so you aren’t limited to one source selection. Just add the emails you want for one source, then repeat step 4-7 for the next source you want to pull emails from. Once you have one or more mailing lists setup, these will show in the select box that appears when you choose “Custom” for the mailing list select option on the add/edit trigger page, or the Send Emails page.
Scheduled Trigger Events
This page will show any scheduled trigger events that have been set up in the database. Scheduled trigger events are created when you use certain trigger types that are based on dates/days, instead of an action. These trigger types will create scheduled trigger events:
- Weekly on selected days
- Monthly on selected days
- X days before first Sheet date
- X days before each Task date
- X days after last Sheet date
- X days after each Task date
To keep the hourly CRON function from slowing your site down too much, whenever you save an email trigger of one of the above types, it calculates the next scheduled date/dates for the trigger based on your settings, and adds these to a custom database table. That way, the hourly CRON function only needs to check if there are any triggers that need to be sent on the current date, rather than having to loop through all existing triggers and try to calculate if anything needs to be sent.
If you haven’t set up any triggers of the one of the above types, there will be nothing in the list. But, once you save a trigger for any of the above types, it will calculate the next scheduled date (the next date that the email should be sent) and add that event to the scheduled trigger events database. For example, if you set up a weekly summary type trigger to go out on Mondays, then a scheduled event will be created for the next Monday. It only schedules one unique trigger at a time. When that email is sent successfully, the plugin will automatically figure out the date for the next event after that, and update the scheduled trigger event accordingly.
This list can grow quite large if you set up something like Thank You emails for ALL Sheets and use the “X days after last Sheet date” or “X days after each Task date” trigger type. In those cases, when you save the trigger, it will loop through every active sheet, or taks, that hasn’t already expired, and schedule a trigger event for X days after the sheet/task date. If you have a lot of sheets/tasks, this can create a very large number of trigger events. But, this is not a problem, and is exactly what the database table was designed for. This allows the hourly CRON job to quickly find those email triggers that need to be sent on a certain date, and send them out.
TEST and DELETE buttons
There are two buttons next to each scheduled trigger event. The Test button will allow you to quickly perform a test to see what would be sent out when that scheduled event is triggered. It will send an email summary to the test email address, as well as output the results on the page for you to quickly view without having to check your email. Performing a test will NOT cause the system to schedule the next instance of that scheduled trigger event, so it will still be sent on the date indicated.
The Delete button lets you mark a scheduled trigger event as deleted. It will NOT remove the event from the database, but will instead mark it as deleted in the database and show it as greyed out with the word “DELETED” where the Delete button was. The scheduled event needs to remain in the database until the scheduled date so that on the scheduled date it can then calculate the next scheduled date (for repeating triggers, like weekly or monthly). You can’t undo the Delete action at this time, but if you edit the associated email trigger and just save it again, the all the old scheduled events will be deleted and it will recalculate and recreate all scheduled events from the current date forward.
IMPORTANT NOTES
- If you edit a trigger and save it again, all currently scheduled trigger events for that trigger will be deleted, and then it will calculate them all again (starting from the current date) and add all new scheduled trigger events. This should not be a problem the majority of the time, but if you have deleted a scheduled event trigger, but then edit and save the trigger before the date of the deleted scheduled event trigger, that scheduled event will get added again as a new scheduled trigger event.
- If you create a new sheet and select a trigger to add the sheet to, then the same thing as above will happen since the trigger needs to be edited and saved again, it will clear all current scheduled events, and then recalculate and create those scheduled trigger events again.
- The exception to the above is if a trigger is set for “ALL Sheets”. Then, when you add a new sheet, it will automatically be included in any triggers set to “All Sheets”, and if those are scheduled trigger types, new scheduled trigger events will be calculated for that sheet only and added to the database. This will NOT reset the scheduled events for any other sheets.
- If you are in test mode, on the general settings page, and you reach a date when a scheduled trigger event should happen, the associated email trigger will get sent (assuming conditions are met), but the plugin will NOT update the database for the next date for that scheduled trigger event. So, if you leave the plugin in test mode for a period of time where several scheduled trigger events should have happened, they will all still be waiting to get sent, and they will all get sent out the next time the CRON function fires after you take the plugin out of test mode.
Send Emails
Tests
Set ups for common automatic emails
Thank You Emails
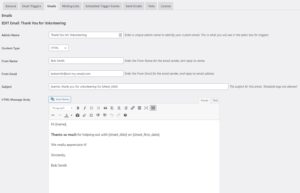
The first thing you need to do is set up your email template for your Thank You emails. Since the trigger we set up will be scheduled on a per sheet basis, we can use the individual sheet template tags. You can use the template tags in the subject and/or the message body. So, a simple Thank You email template might look like the following (click image to open/enlarge):
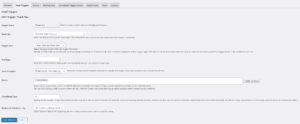
After your email template has been created, you can now create the email trigger. The easiest way to create automatic thank you email triggers is to choose the “X days after last Sheet date” trigger type, and then in the input that appears below that, select the number of days after the last sheet date when you want the email to be sent. Choose 1 for the day after, or 2 for 2 days after, etc. Then, for the Email List select the “Matching Sheet/Task Signups” option. If you always want to send Thank You emails for every event/sheet, then just select “ALL Sheets” in the Sheets multi-select box, otherwise if you only want to send Thank You emails for certain sheets, you can select the specific sheets. You don’t need to bother with any conditions for this trigger. If there are no signups for a sheet, then there will be no email addresses, so nothing will get sent. Once you save the trigger, you should be able to see a single scheduled event, on the “Scheduled Trigger Events” tab, for every active sheet in your system, and the date shown should be the # of days after the last Sheet date, corresponding to the # that you entered for the “# of Days” input. Here is what this set up looks like for the Email Trigger:
Weekly/Monthly Events Summary
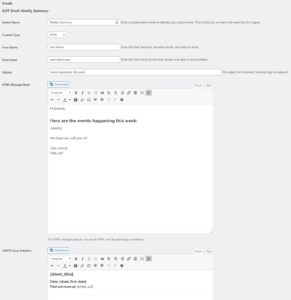
As with the thank you emails above, the first thing you should do is create your email template for your weekly/monthly summary. Since a weekly or monthly trigger type isn’t triggered by the date of a sheet or task, we could have multiple sheets included in the summary, depending on how many days out you set as a condition, and how many events you have each week or month. So, for the email template, you’ll want to use the {sheets} and/or {tasks} template tag in the main message body to indicate where you want the loop of sheets/tasks info to be shown. Then you’ll need to add some of the individual sheet/task template tags to the appropriate sheet/task loop template fields. Below is an example of an email template for a weekly summary using sheet tags:
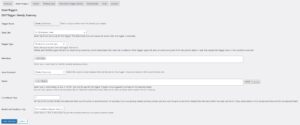
After your email template has been created, you can create the email trigger. For the email list, you can set it up to send to whichever emails you want to send the weekly summary to, perhaps a custom list if some people do not want to receive these emails. In my example, I’m going to set it up to email all WordPress Users, because I’m assuming my system is a closed system and people need to register for an account to view and signup for events. For the trigger type, I’m going to set mine to “Weekly on selected days”, and then I’m going to select Monday in the Weekdays select box so that my emails will go out first thing on Monday mornings (the first time the hourly CRON function gets triggered after midnight Sunday night). Then I’m going to choose “ALL Sheets” in the sheet multi-select, so the info from any sheet during the period I set will get included. I’m then going to enter 7 in the Conditional Days field. That will limit the included sheets to sheets where the start date is within the next 7 days, so it truly is just a weekly summary of events, and not showing any events past 7 days from when the email is triggered. Once you save the trigger, you should see a scheduled event on the “Scheduled Trigger Events” page for the next Monday. It will only schedule one at a time. When the current scheduled trigger event gets triggered, and the emails are sent, it will automatically reschedule itself for the next Monday. Below is the way this set up looks:
Weekly/Monthly Signup Summary for Admins
Here is how to set up a weekly/monthly email that is just sent to admin users (or any custom email list) to summarize all the signups for the past week/month. First, create your email template. For this one, we will use the newer “Signups” loop template and the newer “Signup” additional conditional field. Set up the main body with any generic info you want to include, and then put the {signups} template tag where you want the info from the signups loop template to appear. My simple message body looks like this: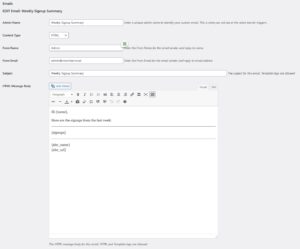
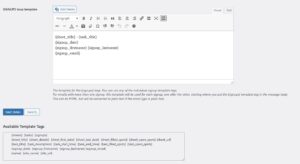
Then, in the Signups Loop template, I added the signup info template tags, along with sheet and task titles, as shown below:
Then create your custom email list for whoever you want this weekly/monthly summary sent to and give it a name you will remember. I just created an “Admin” email list with just my admin email for testing.
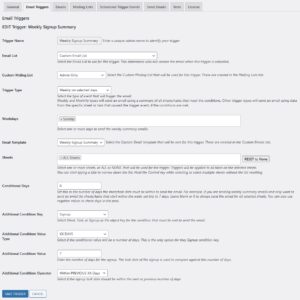
Then create your email trigger giving it a name such as Weekly/Monthly Signups Summary.
For the email list, select Custom Email List and then choose the email list you created in the select box that appears.
For Trigger Type select Weekly On Selected Days, or Monthly On Selected Days (whichever you prefer). Then select the day, or days, you want the email to be sent.
Select the email template you created above.
For Sheets, select “All Sheets”, unless you only want a summary for specific sheets. If you want a summary of all signups during the week/month, then set it to “All Sheets”.
Leave the conditional days set to zero since we don’t want to send this based on any Sheet or Task dates, instead we will use the additional condition fields below.
For the “Additional Condition: Key”, select “Signup”. When you select that, there is only one option for “Additional Condition: Value Type”, which is XX days.
For the “Additional Condition: Value”, I’m going to set it to 7 since I’m doing a weekly summary. But, you may want to set it to 30 or 31 for a Monthly summary. Since there aren’t a fixed number of days per month, this is probably better as a weekly summary.
For the “Additional Condition: Operator”, I’m setting it to “Within Previous XX Days” so I can get all the signups where the signup task date was within the last 7 days.
The trigger for my weekly signups summary looks like this:
Save the trigger and check that it’s scheduled properly in the Scheduled Trigger Events tab, and click on the Test button for the next scheduled occurrence to make sure it works the way you expected.
